In my previous blog postin which I answered the most frequently asked questions that I often hear in the dental office when talking about dental veneers, I wrote that the step-by-step and appointment-by-appointment planning would be enough for a whole blog article. Well, this is it.
Let us start at the beginning.
Aesthetic assessment
Making an appointment is necessarily the first step. Whether you are already a patient of Vélez y Lozano, or if it will be your first visit to our dental clinic in Murciayou will need to make an assessment appointment with me.
At this first appointment, the first thing we will do is get to know each other. It may sound a little strange to you, being a dental issue, but it is essential that we talk about the aspects of your smile that concern you and that you want to improve. We will also carry out the necessary diagnostic tests and make an assessment of the general state of health of your mouth, because it is essential to have proper oral health, as I'm sure you will agree.
We will also answer all your questions, which we are sure you will have. Many of these questions are already answered in the article I mentioned in the introduction, which you can visit at the link, and others will arise as we consider the best treatment options for you.
To make an appointment for an aesthetic assessment, you can do so through our usual channels, i.e. by calling 968 28 46 28, by sending a WhatsApp to 641 60 88 32 or by applying for a online appointment through here. In any of the three cases, please specify that you want a consultation with me, Diego, because you want to improve your smile. Our reception team will give you the appointment and all the information you need regarding our location in the centre of Murcia and how to get to and park in one of the car parks we have an agreement with, if you need it.
Simulation
This is, again, a crucial step. Before we do anything to your teeth, we always do a 3D scan of your mouth and our ceramist digitally designs your new smile, or at least a first version of it. We test this first version in the mouth by transferring it using a resin to make the simulation, which gives us a lot of information about the proportions, shape and orientation that the veneers will have.
View this post on Instagram
We call this mock-up, and I have already talked about it in another article in this blog.
Like an architect presenting a building plan for the first time, this is a starting point, not a finishing point. From this first test, we assess how satisfied we and the patient are with it, and either make the appropriate changes or move on.
Dental preparation and measurements
This is the step that generates the most doubts and controversy among patients, at least in my experience. It is a part of the treatment that is highly intoxicated by information coming from two extremes: the extreme grinding done in low-cost clinics, which unfortunately is becoming relatively popular among those who want an exaggeratedly white smile design and do not want to pay for professional advice and quality materials, and those professionals who advertise ultra-thin microfills (and other marketing terms with which I am not particularly comfortable) that practically adhere by themselves to the tooth and certainly do not need any modification.
There are plenty of examples on both sides, and I do not intend to dwell on them. Just to clarify one point, why do I talk about tooth preparation instead of grinding? I know it may sound like those marketing tactics I mentioned that I am not comfortable with, but they are not really the same thing. In the case of ceramic veneers, we just smooth the shape of the tooth, polish any enamel corners that may be damaged by trauma or bruxism and make it easier to insert the veneers. A grinding is the one that is done for a crown (as in the low-cost clinics I told you about), as it is necessary to remove almost all the enamel and weaken the structure of the tooth, which is why it is 'crazy' (excuse the language) to do it for aesthetic reasons.

To give you an idea, most of my patients, after the tooth preparation appointment, leave the clinic without a provisional and when they return for the fitting appointment, they tell me that no one has noticed that we have touched them and that they have had no discomfort or pain whatsoever.
Laboratory
Ceramic veneers are not manufactured in a dental clinic, but in a dental laboratory. The ceramic prosthetists are artists who, under my instructions and after discussing everything with the patient, create these thin ceramic sheets that they stain and polish for a natural and stunning result. Nothing to do with these artificial, square teeth that we sometimes see on TV.
Placement
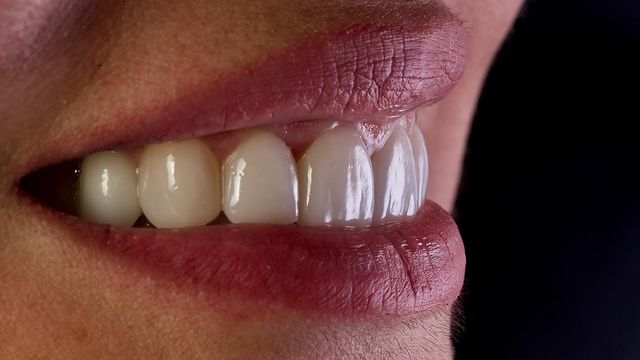
Two weeks after the preparation appointment, the big day arrives: the veneers are cemented. Usually in a single appointment, lasting between 1 and 2 hours, we cement the veneers with a biocompatible dental adhesive. This is the happiest moment of the treatment. I am not exaggerating if I tell you that I have even seen some patients cry with emotion when they see themselves in the mirror.
Unloading splint
Veneers, like the teeth themselves, do not wear down when we eat, as the contact between teeth during chewing is minimal, as food is placed between them. On the other hand, at night, almost all of us clench our teeth while we sleep. I do it myself, and considering that recent studies indicate that 90% of the population does it, you probably do too. For this reason, on the same day we fitted the veneers we took measurements for an unloading splint, a device that prevents the damage caused by this nocturnal clenching and thus protects our veneers. A few weeks later we deliver the veneers and use this appointment for a check-up and final adjustments, if necessary.
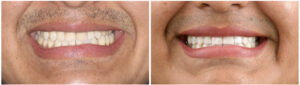
Final photos
During the whole process, we take a lot of photos, because they are essential to make a good diagnosis and aesthetic analysis, to communicate with our ceramist, and to record all the small details related to the treatment. But the ones we are most excited about are the final photos, in which you show us your best smile, the greatest reward for our work.
Maintenance
Once you finish your treatment, we will schedule a maintenance appointment. This is normally done after 6 months, and ideally every 6 to 12 months thereafter. At this appointment we perform a hygiene check, in which our hygienists remove tartar from your mouth and use specific instruments to check the veneers and the gums in that area to maintain optimal health.